Panduit Labels
Lets you to generate labels for wires, cables and devices in your project. You can select a Panduit label part number so that the output will be correctly formatted for use in the Panduit Easy-Mark label-printing software.
Accessed from:
The following dialog opens:

| Setting | Description |
|---|---|
| Wire Labels | Select this option to print only Wire Labels. |
| Cable Tags | Select this option to print only Cable Tags. |
| Device Labels | Select this option to print only Device Labels. |
| Select Label | Displays the
Panduit Part Number Selection dialog, which enables you to
select a part number for special Panduit parts.
The form will be filtered automatically for part numbers that correspond to Panduit labels. Once you have found the desired part number, highlight it and select the OK button. The Panduit Labels dialog will re-appear with the selected part number displayed. |
| Quantity Per Wire/Cable/Device | Enter a value to determine how many labels will be created with each wire number or ID. |
| Filter |
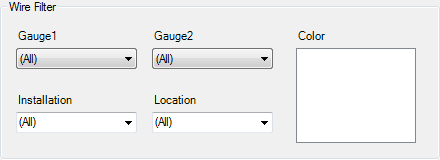
The filter fields in the center of the dialog will vary depending on the label category you selected (Wire Labels, Cable Tags, or Device Labels). These allow you to filter the range of items in your project that will be included in the output. For wires, define a range of wire sizes by selecting
an upper and lower value in the
Gauge1 and
Gauge2 fields. If you have assigned wire
colors, you can limit output to a selected color in the
Color field. You can also limit the
output to a selected Installation or Location using the provided fields.
For cables, you can define a range of cable
diameters by selecting an upper and lower value in the
Diameter <= and
Diameter >= fields. You can also
limit the output to a selected
Installation or
Location using the provided fields. In
the
Export Full ID field you can select
when the full ID (Installation-Location-Device Tag) will be included on the
label rather than just the Device Tag. Select
Never,
Always, or
When Cable Leaves Enclosure.
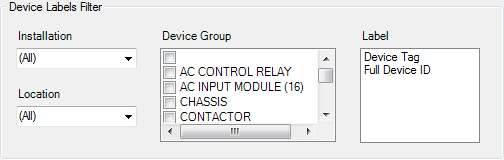
For devices, you can limit the output to a selected
Installation or Location using the provided fields. In the
Device Group area, you can select check
boxes for categories of devices (this corresponds to the values in the
Category field of the parts database).
Select the top (blank) check box for items that have no entry in the
Category database field. In the
Label area select whether the label
will include only the device tag or the full device ID
(Installation-Location-Device Tag).
|
| Start Easy-Mark | If you are going to use the Easy-Mark label printing software, select the Start Easy-Mark check box. When this is selected, the output will be sent to the Easy-Mark software when you select the Export button. |
| Config Easy-Mark | If you are going to use Panduit's Easy-Mark label
printing software, select the
Config Easy-Mark button. The Easy-Mark
program allows you to see labels on-screen as they will appear when printed.
The
Panduit Easy-Mark Configuration dialog
will appear.
In the Location of Easymark.exe field, use the Browse button to locate and select the path to this file. In the Labels per row field, enter the number of labels you wish to print per row in the Easy-Mark software. Select Save to save your settings. |
| Export To | If you wish to export the label information to a CSV (comma-separated variable) file, use the Browse button beside the Export To field, browse to the desired folder, and enter the desired file name. This information will then appear in the Export To field. |
| Export | Sends the selected label data to the Easy-Mark software, to a CSV file, or to both, depending on your settings. |